How to Paint an Interior Door Without Removing It: Easy DIY Tips for a Fresh Look
|
Time to read 8 min
|
Time to read 8 min
You can absolutely learn how to paint an interior door without removing it, achieving that crisp, pro-level finish right in place. Home improvement pros estimate DIYers save up to two hours per door by skipping the hassle, turning a weekend chore into a quick win. This method shines for busy folks or heavy solid-core doors that are a nightmare to maneuver.
In this guide, we'll break down why painting interior doors in place rocks, the must-have tools with an eco-twist, a foolproof step-by-step to nail it drip-free, pro tips to dodge pitfalls, and sustainable upgrades for green vibes.
Whether you're eyeing black doors for that moody trend or soft grays for calm, these DIY interior door painting tricks will have your home looking sharp without the sweat.
Ready to roll? Let's get started!
If you are planning to paint your house interior, in this article you will learn easy steps to make your home interior feel new again with step-by-step guides for all interior surfaces.
In a world of trends favoring bold contrasts like matte black or earthy taupes on interior doors, refreshing them shouldn't mean major disruption.
Painting an interior door without removing it keeps things simple: No need to prop it up, fiddle with shims, or risk misalignment when rehanging.
It's ideal for apartments, historic homes with tricky trim, or anyone short on time—think a quick bedroom door update before guests arrive.
Pros abound: Minimal mess (contained to one spot), faster project turnaround (dry in hours, not days), and zero hardware removal drama.
Cons? Gravity can cause runs on vertical surfaces, and overspray might hit floors or walls, but smart taping nixes that.
Plus, in tight spots like a half-bath, maneuvering a ladder around a detached door is a no-go.
Here's a bullet-point list of prime scenarios where this shines:
Hate door removal hassles? This method's your hack, blending efficiency with style.
Door painting: Painting it standing up saves time and suits quick touch ups, though drips are a risk. This article explores both methods to help you choose the best approach for a flawless door painting project.
Stocking up right sets you up for success. Focus on quality basics that double as eco-heroes, like reusable cloths over disposables. For a standard hollow-core door, budget $50-100; scale for multiples.
Item |
Purpose |
Eco-Tip |
Low-VOC Primer |
Seals old finish |
Reduces fumes by 90%; water-based for easy rinse thisoldhouse.com |
Reusable Drop Cloths |
Catches drips |
Canvas lasts years vs. plastic waste |
Natural Degreaser |
Cleans grime |
Plant-based skips harsh chemicals md-canada.com |
Synthetic Brushes |
Applies evenly |
Recyclable; pair with vacuum storage to cut water use |
Grab these, and you're primed.
Door painting: This article explores why these three colors are poor choices for front door paint, offering insights into better alternatives and tips for a stunning, long-lasting finish.
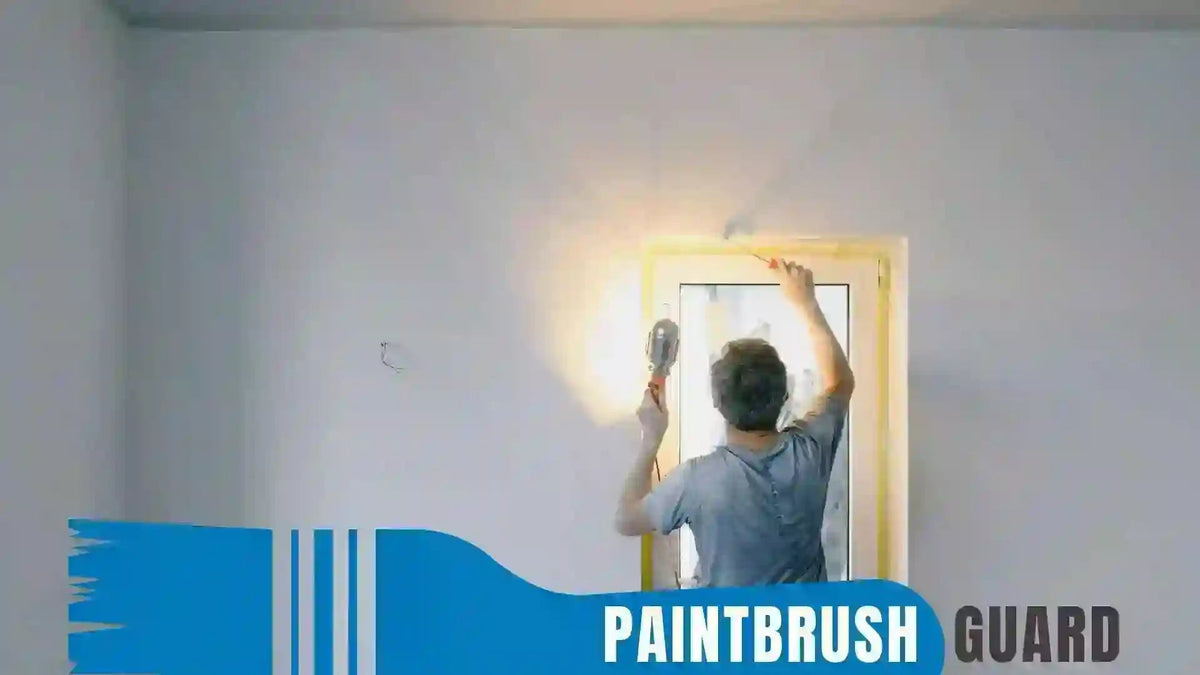
Mastering how to paint an interior door without removing it boils down to prep, patience, and physics-defying taping.
This step-by-step guide targets a flat-panel door in a hallway; adjust for raised panels by feathering edges. Total time: 4-6 hours active, plus drying. Work top-to-bottom to fight gravity.
Start here - 80% of pro finishes hinge on clean surfaces. Open the door halfway; prop if needed for stability. Vacuum dust from panels and hinges.
Safety first: Use a stable ladder in narrow spots; ventilate with fans for low-VOC fumes.
Primer locks in old colors, preventing bleed and essential for dark-to-light changes.
Eco-note: Water-based primers dry fast and rinse clean, slashing solvent waste.
Before paint, reinforce: Double-tape tricky spots like knob holes (remove hardware if easy). For 2025's bold blacks, extra layers prevent wall bleed. Test tape pull-off on a corner.
Two thin coats beat one thick and avoids runs on vertical hangs.
Dry 2-4 hours between coats; full cure 24 hours before heavy use. For semi-gloss trends, buff lightly post-dry for sheen.
Peel tape at 45-degree angles while semi-wet; touch up pulls. Rinse tools in soapy water, then vacuum-store brushes for reuse that saves gallons vs. deep cleans. Inspect under light; sand and spot-paint holidays.
Quick Checklist |
Done? |
Tape hinges/frame |
✓ |
Sand & clean |
✓ |
Prime evenly |
✓ |
Two thin coats |
✓ |
Cure fully |
✓ |
Unsure what color to paint interior doors? Discover 7 expert picks from bold black to soft sage that enhance style, mood, and flow. Plus sustainable tips!
Even vets slip, but these dodge 90% of woes. From expert roundups, rushing prep tops the list. Always sand, or watch paint flake in weeks.
Ditch solvent thinners because water-based everything reduces VOCs by half.
Store wet brushes in vacuum seals to skip full rinses, conserving water.
What if drips hit anyway? Wipe immediately with a damp cloth. Practice makes pros.
The sustainable shift means low-VOC paints aren't optional. They're essential, emitting fewer toxins for healthier indoors.
Opt for water-based formulas with natural binders; they dry odorless and rinse sans harsh cleaners. Reflective sheens bounce light, cutting energy needs.
More tips:
These tweaks make your door project planet-positive.
Is it cheaper to paint an exterior door or buy a new one? This article explores the cost comparison, factors influencing the decision, and tips for painting an exterior door to achieve a durable, attractive finish, helping you make an informed choice.
Painting an interior door without removing it? It's a game-changer. Efficient, low-fuss, and perfect for nailing warm neutrals or dramatic blacks.
From taping tricks to thin-coat mastery, this DIY delivers pro polish minus the pain, all while going green with low-waste hacks.
Tired of tired doors? Grab your tape, prime that panel, and watch your space transform. Our vacuum storage tool makes cleanup effortless. Shop now for drip-free doors that wow!
Yes, you can paint an interior door without removing it using smart taping and top-down techniques to combat drips. This method saves time and hassle, especially for heavy doors, by keeping everything in place—just prep thoroughly with sanding and cleaning for adhesion that lasts. Pros recommend it for quick updates in rentals or tight spaces, ensuring a smooth finish without hardware removal drama.
The best way to paint a door on the wall is thin coats with an angled brush for edges and a foam roller for panels, working top-to-bottom. Tape hinges and frames meticulously, sand for grip, and prime first to block old colors. Allow 2-4 hours drying between layers; this vertical approach minimizes runs and yields even coverage, ideal for trendy semi-gloss sheens.
To avoid drips when painting interior doors in place, load tools sparingly and roll off excess on the tray grid before applying. Use two light coats over primer, feathering strokes downward, and reinforce tape on edges for catch-all protection. Working in a well-ventilated space helps dry faster, reducing sag risk, a pro staple for flawless, gravity-proof results.
For beginners painting doors without taking off hinges, start with low-tack tape over hardware and a degreaser wipe-down to ensure stick. Cut in edges first with a quality brush, then roll lightly in "W" patterns; patience with drying prevents smudges. Eco-tip: Low-VOC paints cut fumes, perfect for first-timers aiming for that fresh, trend-forward look without overwhelm.
For interior door painting trends like earthy taupes or black accents, test samples in your lighting first for true tones. Go semi-gloss for durability in high-use areas, and embrace color-drenching with walls for depth. Sustainable low-VOC options enhance these warm neutrals, blending style with eco-smarts for inviting, modern homes that feel grounded.
Mark Walsh
Written by Mark Walsh, a home improvement specialist with over 15 years of hands-on experience in interior painting. Mark has completed hundreds of DIY and professional projects, from basic wall refreshes to complex textured applications, and is passionate about sharing practical, beginner-friendly advice to help homeowners achieve lasting, professional-quality results.


